Overview
Security is a fundamental aspect of any 1:1 Chromebook program, as it ensures that students utilize their devices in a safe and productive manner. This document outlines several critical elements of the Google Apps for Education Admin Console that must be correctly configured to facilitate a successful 1:1 experience. The Google Apps cloud-based policy consists of various settings that are essential for maintaining security and appropriate usage.
It is important to note that while User Settings are automatically applied to the Chrome browser when a user logs in, Device Settings are only enforced on the Chromebook if it has been enrolled under the school's enterprise policy, which is set up via the admin console. For additional information regarding Google’s Chrome Policy Management and the different policies applicable to users and browsers, please refer to the Knowledge Base.
Google Chrome Policy Management
Device Settings
Enrolling Devices
To ensure that Device Settings are effectively applied, it is necessary to enroll the Chromebook devices in your school’s policy. This enrollment allows for the implementation of crucial settings, such as managing guest mode access and enforcing sign-in restrictions. When Chromebooks are first delivered, students can log in using their credentials created in the admin console, which automatically enrolls the devices into the school’s enterprise policy without requiring the administrators to log in individually to each device.
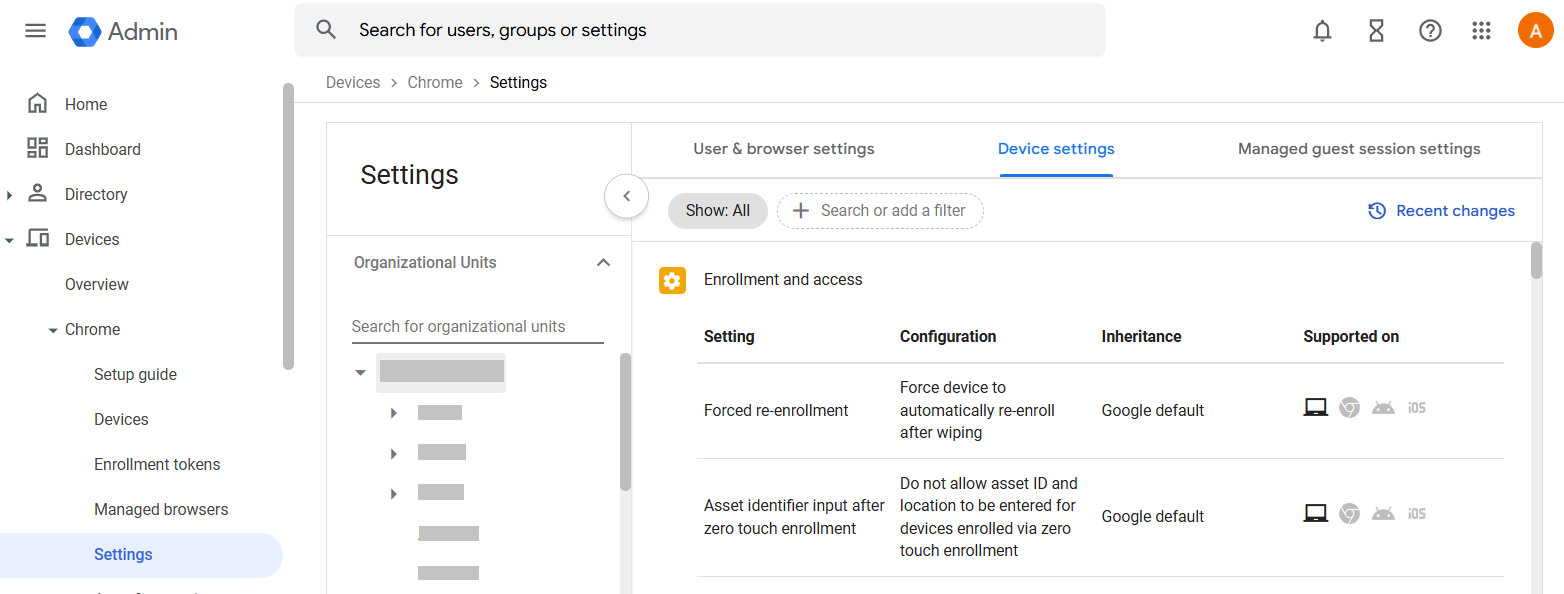
- Navigate to Devices > Chrome > Settings > Device Settings > Enrollment and access > Forced re-enrollment
- Select the 'Force device to re-enroll into this domain after wiping' configuration and save.
This action is crucial for organizational units (OUs) that need to be managed by the admin console.
Disabling Guest Mode
Guest mode on Chromebooks can allow users to bypass the school district’s filtering policies, potentially exposing them to inappropriate content. Therefore, it is highly advisable to disable guest mode across all devices. Guest mode functions similarly to incognito mode in Chrome browsers, which is also recommended for disabling. To turn off guest mode:
- Navigate to Devices > Chrome > Settings > Device Settings > Sign-in settings > Guest mode
-
Select the 'Disable guest mode' configuration and save.
Implementing Sign-In Restrictions
It may be necessary to restrict users from logging in with their personal Gmail accounts on school-owned Chromebooks. Allowing personal Gmail accounts can lead to evasion of filtering and auditing measures in place for the Chromebooks. In addition to disabling guest mode, you need to restrict sign-ins to your school's domain (e.g., *@k12publicschools.org). This measure ensures that only users with school email addresses can log in.
- Navigate to Devices > Chrome > Settings > Device settings > Sign-in Settings > Sign-in restriction
- Select the 'Restrict sign-in to a list of users' configuration, enter your school domain and save.
User Settings
The primary navigation for all user settings can be found under Devices > Chrome > Settings > User & Browser Settings in your G Suite admin console. One important aspect of user settings is customizing the startup display pages. It is possible to predefine which web pages automatically display when users start their Chromebooks. It is advisable to include your school’s Acceptable Use Policy (AUP) among these pages to remind students of their responsibilities regarding online conduct and adherence to school policies. To customize startup pages, navigate to Devices > Chrome > Settings > User & Browser Settings and scroll down to Startup section, and input the desired web pages in the text box for 'Pages to Load on Startup'
Enabling Safe Browsing and Safe Search
Chromebooks are generally resilient against most malware, making them a good choice for protecting students from malicious websites. However, to enhance security, it is recommended to enable Safe Browsing, Safe Search, and malicious sites settings within G Suite. Safe Search ensures that users receive safe search results, shielding them from age-inappropriate content. Moreover, protecting against malicious sites helps mitigate risks associated with phishing and identity theft. To enable these features, navigate to Devices > Chrome > Settings > User & Browser Settings and select the appropriate options under Chrome Safe Browsing section.
Bypass DNS Pre-fetching
Sometimes, user activity may be inaccurately logged due to DNS pre-fetching, where websites are recorded as visited even if the user did not actually access them. For example, if a user searches for the Facebook login page but does not click the link, the browser may still log this as activity. To avoid this misrepresentation:
- Navigate to Devices > Chrome > Settings > User & Browsers Settings, scroll down to the User Experience section.
- For the DNS pre-fetching field, select the 'Never pre-fetch DNS' configuration and save.
- For the Network prediction field, select the 'Do not predict network actions' configuration and save.
Proxy Settings
Setting the Chrome Proxy settings to "Allow users to configure" ensures that the Chrome browser respects SmartPac settings on Windows and Mac devices, maintaining filtered traffic. To configure proxy settings:
- Navigate to Devices > Chrome > Settings > User & Browser Settings > Network > Proxy mode
- Select the 'Allow user to configure' configuration and save.
Disabling Incognito Mode
Similar to guest mode, it is also advisable to disable Incognito mode for Chrome browsers. Incognito mode allows users to bypass filtering, which can expose them to harmful and inappropriate content.
- To disable this mode go to Devices > Chrome > Settings > User & Browser Settings > Security > Incognito mode
- Select 'Disallow incognito mode' and save.
Managing Apps and Extensions
Many students may attempt to download non-educational apps or games onto their school-issued Chromebooks. To maintain focus on learning, schools may choose to restrict app installations. To enforce this restriction:
- Navigate to Devices > Chrome > Apps and Extensions > User app settings and click on Edit button under Allow/block mode.
- Select 'Block all apps, admin manages allowlist' configuration from the dropdown menus and save.
Disabling Developer Tools for Chromebooks
Students can potentially bypass filtering by using developer tools to tamper with scripts and applications. These tools allow users to debug various issues, which can lead to unfair advantages or exposure to sensitive information. Therefore, it is strongly recommended to disable developer tools on Chromebooks. This can be accomplished by navigating to Device > Chrome > Settings > User & Browser Settings > User Experience.
Select the 'Never allow use of built-in developer tools' and 'Do not allow use of developer tools on extensions page' configurations.
Blocking URLs
There are numerous methods students might use to circumvent the filtering systems implemented by the school. One effective approach to prevent this is by blocking specific URLs in your user settings. To block URLs, navigate to Devices > Chrome > Settings > Content > URL Blocking.
In the entry field, add relevant URLs (such as the ones provided below). For a detailed list and more information on blocking sensitive internal Chrome URLs, refer to this article by Google.
You can copy/paste these directly into Workspace URL Blocking
- chrome://addresses
- chrome://certificate-manager
- chrome://extensions
- chrome://flags
- chrome://hang
- chrome://indexeddb-internals
- chrome://inspect
- chrome://kill
- chrome://network
- chrome://serviceworker-internals
- chrome://settings/privacy
- chrome://settings/reset
- chrome://settings/signOut
- chrome://settings/system
- chrome://version
- chrome://chrome-signin
- data://*
- devtools://*
- file://*
- javascript://*
Disabling Task Manager for Students
Students may gain access to the Task Manager, which would enable them to disable Chrome extensions and other processes critical for ensuring a safe online environment. To maintain control over the management and security of Chromebooks, it is advisable to disable Task Manager access for students.
- Navigate to Devices > Chrome > Settings > User & Browser Settings > Apps and Extensions > Task Manager
- Select the 'Block user from ending processes with the Chrome task manager' configuration and save.
Managing Browser History
It is recommended to prevent users from clearing their browsing history, as this can help maintain accountability.
- Navigate to Devices > Chrome > Settings > Security > Browser history
- Select the 'Always save browser history' configuration for the Browser History field.
- Select the 'Do not allow clearing history in settings menu' configuration for the Clear Browser History field.
Managing User Access to Certificates
To ensure security, it is advisable to restrict users from editing certificates installed on their devices.
- Navigate to Devices > Chrome > Settings > Security
- Select 'Disallow users from managing certificates' for both installed CA certificates and client certificates.
Blocking JavaScript from running on Local Files
As Google does not allow extensions to scan or control files from local paths, these files or links cannot be actively analyzed or blocked by web filters. To prevent students from such launching files, especially those downloaded from unblocked game sites, admins can block JavaScript from executing on those downloaded files. To do this:
- Navigate to Devices > Chrome > Settings > Content.
- Click on the JavaScript option.
- In the “Block JavaScript on these sites” field, add:
file:///*
Enabling Extension Sync
In ChromeOS 140 and higher, Google has changed the way it enforces the Chrome Sync policy, resulting in the Securly extension lacking the needed permissions to function properly. If extension syncing is not enabled from the Google Admin Console and a student disables sync for extensions from their browser settings, the extension monitoring fails. To ensure extension syncing is active, follow the below steps:
- Navigate to Devices > Chrome > Settings > Users & browsers > Other settings > Chrome Sync (ChromeOS).
- Ensure the ‘Allow Chrome Sync’ configuration is selected.
- Uncheck ‘Extensions’ from the section for excluded sync types to ensure extensions are included in sync.
YouTube Restricted Mode
The YouTube Restricted Mode is a valuable tool for limiting student access to inappropriate content on the platform. By enabling this feature, administrators can exercise greater control over the videos and channels accessible to students. It is essential to enable YouTube Restricted Mode from G Suite to ensure that students receive these restrictions upon signing in with their school credentials. To do this, navigate to Apps > Additional Google services > YouTube > Permissions.
Adjust the permissions according to your desired settings.
- Strict restricted YouTube access—Enabled by default only when you choose the option "restrict content for logged-in users in your organization."
- Moderate restricted YouTube access—Users can only watch restricted and approved videos. This offering is similar to the Restricted Mode setting in the YouTube app and offers a larger corpus of videos than the Strict offering.
- Unrestricted YouTube access—Users can browser all YouTube when signed-in even if you have also set network-level restrictions.
- Can approve videos—You can designate individuals or organizational units to approve videos so that signed-in users in their organization can watch them.
Securly Chrome Extension & SSL Certificate
To ensure the best browsing experience and prevent errors on sites that Securly decrypts, it is crucial to install the Securly SSL certificate. Without this certificate, users may encounter privacy errors on popular sites like Google and Facebook, which can lead to confusion about internet accessibility. To install the SSL certificate, download it or contact a Securly sales representative for assistance. Then, navigate to Devices > Networks > Certificates to upload the certificate.
Additionally, the Securly Chrome extension can be easily installed from your Google Admin Console. This quick installation process will push the extension to all Chromebooks belonging to the selected organizational unit. Before proceeding with the installation, ensure that your school domain or subdomains are registered with Securly. To facilitate seamless loading of the Securly extension, ensure that the 'Block Extensions by Permission' field under Apps & Extensions has the checkboxes for 'Geolocation', 'Web Requests', and 'Set Proxy' unchecked.
By adhering to the best practices outlined in this guide, schools can effectively manage Chromebooks and ensure the online safety of students participating in a 1:1 program. Securly is dedicated to providing educational institutions with the necessary tools to protect students from harmful online content, regardless of the device or location.
Comments
Article is closed for comments.