
Overview
Custom Lists lets you build a collection of resources once and apply it across multiple Filter policies. When you update a list, every policy associated with it updates automatically. That means no more repeating the same allow or block entries policy by policy, and no more hunting down every place a URL lives when something changes.
Custom Lists work alongside your existing policy entries. You can keep conventional allow and block entries at the policy level while using lists for anything you manage across multiple policies.
Note: Custom Lists are configuration tools, not new web categories. Entries in a Custom List are added to the allow and block rules of your selected policies and will not appear as separate categories in Activity Logs or reports.
List types
Each list holds one type of content. Lists cannot mix types.
| List type | What it contains |
|---|---|
| URLs | Domains, URLs, and supported URL keyword patterns |
| Search terms | Terms matched as Exact or Contains, set per term |
| YouTube videos | Valid YouTube video URLs |
| YouTube channels | Valid YouTube channel URLs |
Before you begin
Confirm the following:
- Custom Lists is enabled for your account. If you do not see the Custom Lists section in your console, contact Securly Support.
- You have the appropriate Filter admin rights.
- You know which policies you plan to associate with each list.
Accessing Custom Lists
Sign in to Filter and open the Custom Lists from the main navigation menu on the left. From here, you can view existing lists, create new ones, or open a list to manage its resources and policy associations.
Custom Lists also appear inside the Policy Editor when you configure allow and block URLs, allowed and blocked searches, YouTube videos, and YouTube channels.
Creating a list
- Open Custom Lists and click the “Add custom list” button in the top right.
- In the sidebar popup, enter a unique list name that describes the list's purpose rather than a specific policy, for example "State Testing Sites" or "Approved Curriculum Videos."
- Select the list type (URLs, search terms, YouTube videos, or YouTube channels) and add your resources in the entry field. Each resource can be up to 255 characters.
- For search term lists, set each term to Exact or Contains. Use Exact for narrowly defined terms and Contains only when you intend broader matching.
- If you manage multiple accounts as a multi-tenant administrator, you’ll have the option to choose Local or Global usage.
Setting Policy usage to ‘Global’ makes the list available across all schools in your district, and ‘Local’ makes the list accessible only to users within your current school account. Note that single-account administrators can only create Local lists. For more information, refer to the ‘List Scopes’ section below. - Optionally, you can add notes in the ‘Item notes’ and ‘Custom list notes’ fields. You’ll see these notes when viewing or editing the custom list —The note for the list itself will be displayed at the top. The notes for your entries will be displayed in the Notes column. You can later add or edit item with different notes. This can be particularly helpful to understand the intended purpose of the resources.
- Click on Next and optionally make the policy associations. For more information, refer to the ‘Applying lists to Policies’ section below.
- Finally, hit Save.
Content entry rules
- Enter YouTube videos as valid video URLs. YouTube Shorts URLs are not accepted in video lists.
- Enter YouTube channels as channel URLs, not individual video URLs.
- Keep YouTube video and channel URLs out of URL lists. Use the matching YouTube list type instead.
- URL style values are not accepted as search terms. Place them in a URL list.
- Duplicate resources within a list are rejected.
- URL values are trimmed and normalized when saved.
List scopes: Local, Global, and Securly managed
Local lists belong to a single account. This is the standard list type for most Filter administrators.
Multi-tenant Global lists are created by authorized multi-tenant administrators and shared across their associated accounts. Customer level administrators should not edit or delete these shared lists. If you need an account specific variation, clone the list instead.
Securly managed lists are created and maintained by Securly and made available to customers when published. You cannot edit or delete these, but you can use them in your policies and clone them into Local lists for customization.
Applying lists to policies
Associate a list with a policy as either:
- Allow: the list's resources are added to the policy's allow configuration.
- Block: the list's resources are added to the policy's block configuration.
You can add associations in three ways:
- During list creation
- From the Policies tab under your selected policy.
- From the Policy Editor. You can simply look up any of your custom lists by using the search field.
A single list can be associated with as many policies as you need.
The Global Policy accepts Block associations only. Allow associations to the Global Policy are not supported.
Once a list is associated, any change to its resources flows to every associated policy automatically.
If the same resource also exists as a standalone policy entry, removing the list or its association does not remove the standalone copy. Avoid duplicating resources this way unless it is intentional.
Managing lists
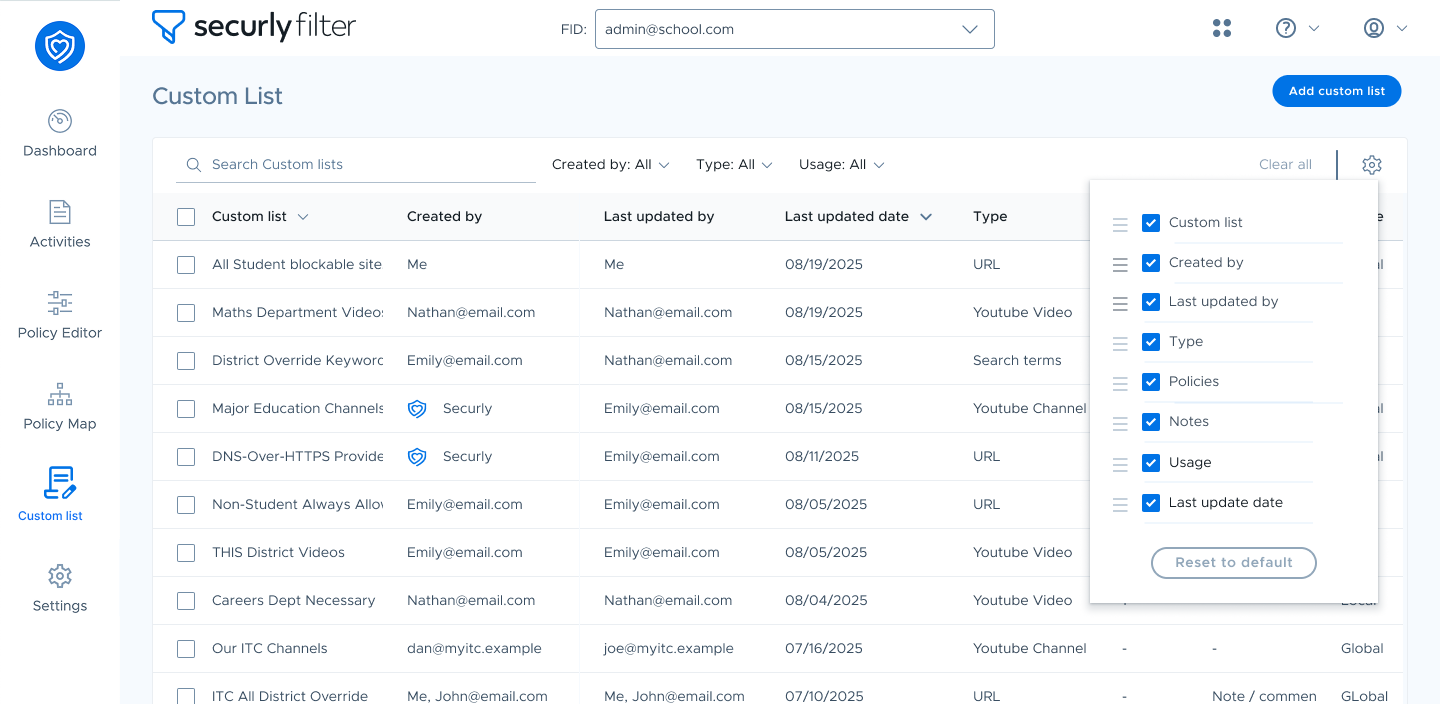
From here the Custom Lists page, you can see who created and last updated each list, when it was last updated, how many policies use it, and its usage scope. This is also where you can:
- Search lists and filter by type and usage
- View a list's details, resources, and associated policies
- Rename a list
- Add, edit, or bulk delete custom lists
- Add, edit, or remove list and resource notes of each custom list
- Link or unlink policies, and switch an association between Allow and Block
- Clone a list
- Delete one or more lists
Editing safely
Edits to a resource take effect immediately in every associated policy. Before making broad changes to a widely used list, review its policy associations so you know exactly what will be affected. For significant changes, consider testing with a limited policy first.
Cloning
Cloning creates an independent copy of any list you can access, including Securly managed and shared Global lists. The clone gets a new name, a usage scope you select, a copy of the resources, and an optional new note. You can clone when a shared list is close to what you need but requires account specific adjustments.
Deleting
Deleting a Local list removes its policy associations and its contribution to those policies. Securly managed lists cannot be deleted by customer administrators. Please ensure to confirm the associated policy count before deleting a list in active use.
Best practices
- Build lists around a stable purpose so they stay reusable as policies change.
- Use descriptive names and record the reason for the list in its note.
- Keep resource types in separate lists rather than working around type restrictions.
- Prefer Exact matching for search terms unless you specifically want broader coverage.
- Review associated policies before editing or deleting any widely reused list.
- Test list changes against a limited policy before rolling out broadly.
- For multi-tenant Global lists, confirm every included account before saving changes.
Reference: validation limits
| Item | Limit |
|---|---|
| List name | Required, up to 255 characters, unique within its usage context |
| Resources per list | At least one required |
| Resource length | Up to 255 characters |
| Resource note | Up to 255 characters |
| Duplicate resources in a list | Not allowed |
| Search term matching | Exact or Contains, per resource |

Comments
Please sign in to leave a comment.